Visar inlägg med etikett lightswitch. Visa alla inlägg

tisdag 5 oktober 2010

Lightswitch - quick screen customization

One quite nice thing with LightSwitch is the quick hack to do easy standard customization without stopping the debugger. All you need to do is click the "Customize" screen in your running application.


This will open up the customization screen where you can easily add and remove visual components from your screen. For example, it's a breeze to add simple standard buttons this way. 


And when your done, you just have to save it and pop back to your running form. Easy as .. pie!


söndag 3 oktober 2010

Lightswitch - adding relations

So, there's that old LightSwitch application of mine. Not that fancy, when do you ever need to have a frontend for an application containing only one single table?

To make the application more interesting, let's start with adding a new table. Right click the "Data source" in the Solution Explorer and choose "Add table". Give the table a good name, like "Project" and add some relevant columns like before. Also, add a column called "Category" (or whatever you prefer) and make it Int16. This one will be our "choice list". To create it, choose "Choice List" in the properties view.


A choicelist consists of a predefined value (an int in this example) and another value that will be displayed on the screen in a combobox.


Relations
When your table is ready - save all the files and start thinking about the relationship between the two tables. In my example, an administrator will administrate many projects, but to keep things simple, every project will only have one responsible administrator.
Start by clicking the "Relations" button in the top toolbar.


Design your relationship as you want it. Note the describing text at the bottom of the window, this one helps you understand the desired behaviour.


Now, after you saved your extremely intelligent relationship you will notice a new column in the "Project" table, namely "Administrator". (That is, if you created a solution like mine. If not, I won't have a clue to whatever the new column is called in your table..)
Now, we will need a better screen for displaying our application. Right click the "Screens" folder and add a new "List  and Detail" screen. Give it a good name, set the "Screen Data" to Projects and let it free!


If everything is well, you should be able to add projects with pre-defined categories and Administrators from the "Administrator" table. (Make sure to put some guys (or girls) in there).

And that's  it for today. The application is not very advanced, but is definietly closer to solve a real world scenario. Next time, I'll add some more logic into the soup!!

onsdag 22 september 2010

LightSwitch - Errors

In case any of the (10 or so) who read this blog felt like it was time to try out LightSwitch themselves, I post this one about an error you might receive.
It turns out that some of us receive an error about missing assemblies when creating a lightswitch project. I received this one myself on one of my machines where I had Vs2010 and the Silverlight packages already installed.
This error has to do with WCF RIA services and the order of the installation. Some googling on the subject will give you more details about it.

The solution is to uninstall WCF RIA services, download it from silverlight.net and then install it again. If you have problems with that (yes I had that to), you might have to do some registry hacking as explained here.
(I only needed to remove the first entries in his list, then it worked for me)

Well, can't be to easy to get the environment running, can it??

tisdag 21 september 2010

LightSwitch - Creating the Data

So, to create a table for your data you can either click the "Create new table" link on the startpage or you can right click the "Data Sources" folder in the solution explorer and choose "Add Table".

The next step is to rename your table, either in the designerarea by clicking its name or in the "properties" view. With that out of the way, start designing your table. You wil lnotice that you got the "id" column by default, but the rest is up to you. Since I plan to put administrators in there, I choose to add FirstName, LastName, Email and Phone in mine.

The "Type" field needs some extra care. This field wil give your Screen the suitable component, like a datepicker control for a "date" field, but will also provide basic validation, so give it an extra thought when designing your table. I have strings for my name fields, but an "EmailAdress" type for my Email and "PhoneNumber" for my phone.

With the table ready, we will just need a simple screen for editing its data. Right click on the "Screen" folder in the Solution Explorer and choose "Add Screen". The "New Screen Dialog" will present you with the available templates. Choose "Editable Grid", change its name and pick your table as the source in the "Screen Data" dropdown list.


And that's it, you should be able to run your basic application by hitting "F5" inside Visual Studio. Try to add some data in the Grid and make sure the validation works

LightSwitch - creating a project

So, the LightSwitch BETA is installed and I have spent a few minutes down at the LightSwitch Developer Center. Its time to fire up Vs2010 and take the first babysteps with this tool.
When firing up VsStudio, choose "LightSwitch" as the template and the language of your choice. Note that you won't be able to change it so choose wisely ;)

When the new project is created it will prompt you for a DataSource. You will either connect to an existing datasource or create a new one in the included SQL Express.

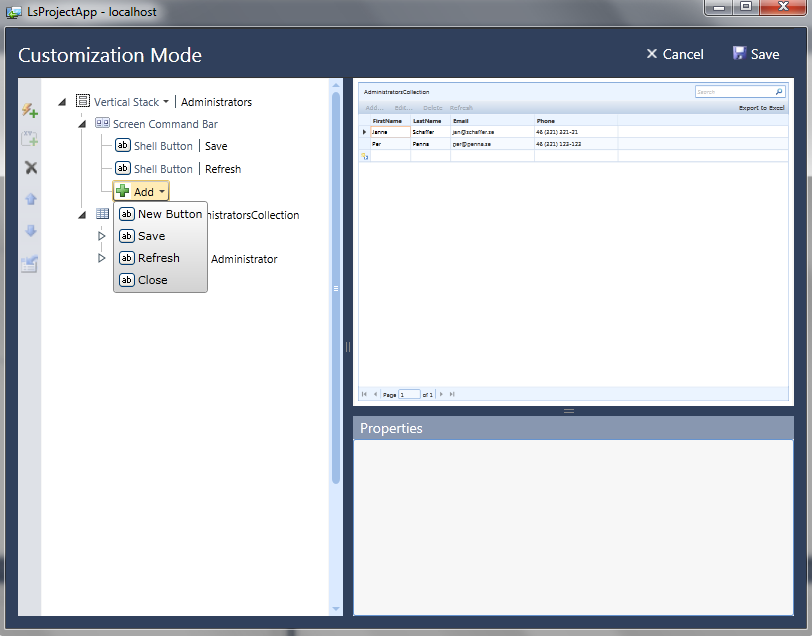
Notice also the interesting "solution explorer". The Default is to show your solution in the "Logical View", which means "Properties", "Data Sources" and "Screens". Screens are the LightSwitch names for views, and we will play around with them in the next step.


Lightswitch

As you might know, Microsoft is working on an "all in one" tool for quick developments called Lightswitch which is available as a beta. The download installs whatever you need, or in case you have an existing vs2010, gives you a new Template in Vs2010 based on Vb or C#, whatever you prefer.

Lightswitch uses common Microsoft technologies and products behind the scenes but glue it all together in a more rookie-friendly presentation.

I'm always interested in magic tools who promise to cut my development time so I intend to take this one for a ride. Stay tuned for more information